Like most modern word processors Help+Manual can also insert special characters not available on the keyboard, horizontal lines and hard page breaks.
Please note that special characters and hard page breaks need to be used with consideration for the limitations of your chosen output format: If the fonts required for the characters are not available on the user's computer the characters will not be displayed.
Page breaks are also inserted in HTML and will work there in browsers that interpret them correctly.
Solving the "characters not available" problem
Symbols and special characters are frequently a problem. Even though they may display fine on your computer, you will have issues if the user does not have the corresponding fonts installed. Either they will see garbage characters, like a square or question mark, or worse, the wrong character. This applies in particular if you use dedicated symbol fonts like Font Awesome or Fontello.
Convert symbol characters to SVG graphics
In both HTML and print (PDF and Word) output, Help+Manual can solve this problem by automatically converting symbol characters to scalable SVG graphics. This display with exactly the same quality as font characters and they have great advantages:
•They always work. Since the SVG is the character it cannot happen that it will be displayed incorrectly
•The quality is the same as font characters, at all sizes.
•In HTML web fonts are often blocked by security settings and ad blockers. That can't happen with SVG characters.
Help+Manual has an intelligent function for inserting typographic/curly quotation marks instead of the standard computer vertical quotes. The main function is accessed in the Symbol tool in Write > Insert Object:
Selecting the quotes style
First click on the arrow at the right end of the Quote(s) entry in the menu and select the style of quotes you want to use. You only need to do this once for any quote style. After that Help+Manual will remember it until you change it.
Select text and apply quotes
The easiest way to apply curly quotes is to select the text you want to quote and then select the c entry in the menu. The quotes will be applied at the beginning and end of the selected text.
Applying curly quotes singly
Just position the cursor at the beginning of the text and select the Quote(s) entry in the menu, then position the cursor at the end of the text and select the entry again. Help+Manual will figure out whether the quote is at the beginning or the end of the quoted text and insert the correct quote character.
Set a keyboard shortcut for curly quotes
If you use quotes a lot you won't want to select the menu every time. Go to View > Program Options > Shortcuts and define a keyboard shortcut to the Insert quotation marks entry in the Insert group. This works both for quoting selected text and inserting quotes singly. It will use the currently defined quotes style.
Note that It doesn't make much sense to use characters from a rare font in your WebHelp or HTML Help output, because most users won't have that font installed on their computers. If you use rare fonts in PDF you can embed the font in your output, but this will significantly increase the size of your PDF file. (Configuration > Publishing Options > Adobe PDF > Font Embedding.)
1.Click in the editor in the position where you want to insert the special character.
2.Select Write > Insert Object >
3.Common special characters can be selected directly in the menu -- or select More Symbols... to display more characters and all available fonts.
Keyboard shortcuts for special characters
You can assign keyboard shortcuts to a number of these characters in View > Program Options > Shortcuts.
Keep the Symbol tool open for other characters
You can keep the Symbol tool ("More Symbols") open while you are working to provide quick access to special characters. This is particularly useful if you have defined a custom list of characters – see further below in this topic for details.
Exporting special characters as SVG graphics for consistency
You can configure your project to export symbol characters as scalable SVG graphics for maximum compatibility. See further below for details.
In addition to the standard symbol fonts available in Windows, Help+Manual supports the installation of dedicated symbol fonts like the popular Font Awesome and Fontello systems.
Converting the symbols to SVG for maximum compatibility
This section explains how to get and use these fonts. See further below for instructions on activating the option to convert to SVG for maximum compatibility on all output formats.
The standard Font Awesome font is pre-installed!
The standard set of open-source Font Awesome symbols is preinstalled in Help+Manual 9. You can get it by selecting the FontAwesome font as described below.
How to get and install additional dedicated symbol fonts
These are standard font files but you choose the character sets you want them to install. You generate them by visiting the website of the font provider (for example Font Awesome or Fontello). You choose the symbols or symbol sets you want to include, then you generate and download the fonts containing your selected symbols.
You ONLY need the desktop fonts!
You only need the normal desktop fonts. All the SVG conversion is handled by Help+Manual, so you don't need any of the web font components. How this works varies depending on the font system. For example, Font Awesome has a specific download page for the desktop fonts only. Fontello always downloads a zipped package for web use. Whichever method, you only need to take the TTF or OTF desktop font files and install them in Windows by double-clicking on the .ttf or .otf font files.
Using the fonts
To insert symbol characters from these fonts just use the regular Write > Insert Object > tool, with the More Symbols option. When it opens, select the font at the top from the drop-down list:
Set up a keyboard shortcut for the Symbol tool!
If you insert symbols frequently it's a good idea to set up a keyboard shortcut for the Symbols tool. You can do this in View > Program Options > Shortcuts. The tool ("Insert Symbol Character") is in the Insert group there.
Keep the Symbol tool open for other characters
You can also keep the Symbol open while you are working to provide quick access to special characters. This is particularly useful if you have defined a custom list of characters – see further below in this topic for details.
Locating the symbol character set
These dedicated symbol fonts have "reduced" character sets. The actual characters defined in the font only make up a tiny subset of the entire Unicode list. So when you select the font you will initially see the normal characters and symbols at the top of the list. You will usually need to scroll all the way down to the end to find the special symbols that are actually defined in the font.
Custom Symbols tab: Your symbols for reuse
The Custom Symbols tab in the Insert Symbol tool allows you to store a list of multiple symbols from multiple fonts for quick access. In addition to single symbols you can also store entire symbol sequences here.
Adding symbols to the custom list:
Select a symbol in the Character Map tab and click on the Add to Custom button at the bottom. Once it is in the custom list you can change the font, font size and font color in the Custom Symbols tab.
Creating sequences of symbols:
You can enter sequences of symbols in the Symbol Text field. There are a number of ways to do this, depending on the font and the symbols you are using. In all cases you can start by creating a new custom symbol entry with the New button on the right.
Fonts with normal characters: Just type the symbols into the Symbol Text field via the keyboard. You can use the New button for this to create a new entry, then just type in the Symbol Text field.
Symbols for which you know the decimal ALT codes: Click in the Symbol Text field, then hold down the ALT key and type in the ALT code on the numeric keypad of your computer. For example ALT+0222 for the symbol.
Special symbols you don't have the ALT codes for: Add the symbols to the custom list via the Character Map tab using the Add to Custom button, as described further above. Then copy and paste the characters from the Symbol Text: field of one entry to another to build the sequence you want.
Symbols and special characters are frequently a problem, because they often display incorrectly, or are blocked, on your users' computers. This applies in particular if you use dedicated symbol fonts like Font Awesome or Fontello (see further above). You can solve this problem by activating Help+Manual's ability to convert these symbol fonts to SVG graphics on publishing. This looks exactly the same as the symbol font characters and scales with the same quality, but unlike the font version it always works.
Converting to SVG in HTML-based formats (WebHelp, eWriter, ePub, Kindle and CHM)
Open your project in Help+Manual. Then in the Project Explorer on the left, navigate down to Configuration > Publishing Options > WebHelp > HTML Fonts. The settings here are also used for CHM, eWriter, ePub, Kindle and Visual Studio Help.
Just hit the Add Symbol Font button and add the fonts you want to convert to SVG on publishing. That's it. You can also remove fonts, if necesary.
Converting to SVG in CHM / Microsoft HTML Help:
CHM has access to the same setting in Configuration > Publishing Options > Microsoft HTML Help > HTML Fonts. (These are the same settings, just accessed in a different location.)
Converting to SVG in PDF output
PDF has the same setting for Symbol font SVG conversion, located in Publishing Options > Adobe PDF > Font Embedding:
Word DOCX output
Word DOCX output does not currently support this feature. Symbol characters are exported to Word as regular font characters, not SVG, and depend on the fonts being available on the user's computer for correct display.
Horizontal lines are inserted in their own paragraph and they are not formattable. They always occupy the entire width of the page or table cell in which they are inserted.
1.Click in the editor in the position where you want to insert the horizontal line.
2.Select Write > Insert Object > to insert the line. A dialog will be displayed allowing you to choose the line thickness and color.
Selecting Custom Style allows you to define the thickness and color of the line yourself. In HTML output this styling information will be inserted as inline CSS in the HR line tag. If you prefer the line to be unstyled choose the Browser Default option. This will just insert a plain HR tag in HTML. This won't affect non-HTML formats like PDF and DOCX.
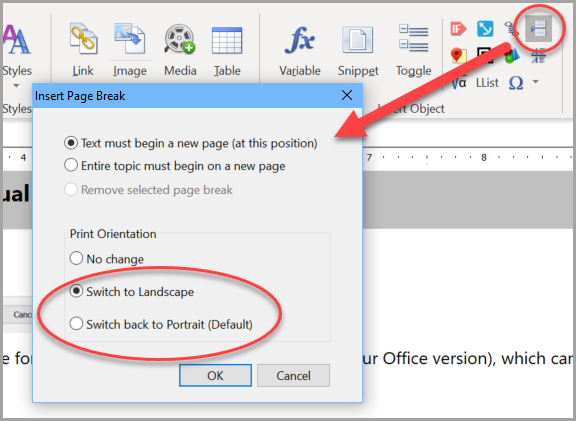
Hard page breaks are only used in PDF, printed manuals and Word DOCX. They are ignored in all other formats.
1.Click in the editor in the position where you want to insert the hard page break.
2.Select Write > Insert Object >
Print orientation: Switch between Landscape & Portrait in PDF
When you insert a page break you can decide whether you want the orientation to switch between landscape and portrait mode in PDF and printed manuals. This enables you to use both landscape and portrait pages within a single document.
Orientation change in PDF and printed manuals only
Note that changing the page orientation is currently only available for PDF and printed manual output. If you want to change the page orientation in Word output you must do this in Word after publishing the Word file from Help+Manual.