Making HowTo screencasts is one of HelpXplain's most outstanding abilities. Instead of having to get everything right in a video you just make a series of screenshots of the program you are documenting. HelpXplain then animates between the screenshots and moves a large mouse cursor, showing the user where to click.
The effect is almost exactly the same as a video HowTo, but it is much easier and faster to make and edit, without any of the stress of video. You can take as long as you like because screenshots are only made when you want and you can always remove them if necessary. If you make a mistake or forget something you don't need to repeat everything. You can delete or add screenshots anywhere in the screencast at any time.
 Productivity Tip Productivity Tip
See the Capture Tool topic for some important tips on using the capture tool effectively for screencasts.
|
Unique screencast features
•You can preview the entire screencast while you are making it!
•Captures left-clicks, right-clicks, selection and drag actions!
•You can pause automatic screenshots and add manual ones at any time!
•If you make a mistake you can delete the last step or all steps!
•You can add steps later without having to redo the whole screencast!
•Try any of those things with screen video capture!
How to make an Xplain screencast
Understanding how screencast screenshots are made
Automatic screenshots:
•When you are making a screencast automatic screenshots are made when you click the mouse. Anything else you do, including typing, does not trigger a screenshot.
•The automatic capture will reliably handle left-clicks, right-clicks, drag operations and selection with the mouse (effectively a drag).
Timing automatic screenshots:
•Automatic screenshots are made before the mouse click reaches your program. To capture a menu and then a submenu, click on the submenu name quickly before the submenu pops open, then click in the submenu.
•If a click opens a menu or dialog, it will make a screenshot without the menu or dialog. You need to click again or use the hotkey to make a second screenshot with the menu or dialog open.
Pausing automatic screenshots
•You can pause automatic screenshots with the button in the top right corner. Then you can make changes in your program and then turn recording on again to proceed.
Manual screenshots
•You can make an additional manual screenshot at any time by pressing the hotkey.
•The default hotkey is (Print Screen) but you can change this in the Screen Capture dialog displayed when you start.
•This works both when automatic screenshots are on and when they are off.
The last screenshot
•The last screenshot is made automatically when you select the Done icon to finish the screencast and load it into HelpXplain.
Applying settings to multiple or all slides
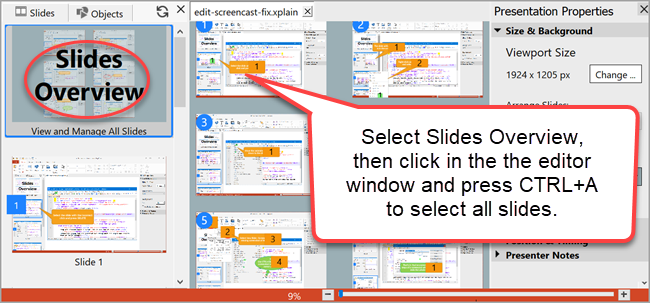
You can apply settings to all slides by selecting the in the list on the left.
1.Select at the top of the Slides list on the left.
2.Click in the canvas editing area where the slides are shown.
3.Press CTRL+A to select all slides or use SHIFT+Click to select multiple slides one after another.
4.Choose the settings you want to change in the pane on the right.
Before you start, set up the program you want to document on your Windows screen, adjust the window size and do a brief run-through of what you want to do so that you are sure that everything appears where you want it to (dialogs, menus etc).
1.Select in the menu of HelpXplain and choose the option. The screen capture dialog appears. You can change the default hotkey (Print Screen) for screen capture here if you wish, for example if it conflicts with another program on your system. (This is also used for manual captures while you are recording). Hotkeys "owned" by other programs cannot be selected, however.
2.Position the dialog over the program to capture and click on . A green capture frame is displayed. Drag this frame to position it over the window of your program.
3.In the row of icons at the top of your screen choose or . This snaps the frame to the window or the window to the frame.
4.Click the button in the center to start. Screenshots are not made until you click.
5.Operate the program normally. A screenshot will be made every time you click the mouse. Left-clicks, right-clicks, double-clicks and drag operations will all be recorded and represented.
6.Press the button to pause/restart automatic screenshots. Press the hotkey (default: Print Screen) to make a manual screenshot. This also works when recording is paused.
7.Click on the tool in the icon bar to make the last screenshot and terminate recording. You will be able to choose if you want an additional text bar next to your slides before the screencast is generated.
Controls at the top of the screen
The controls for adjusting the capture frame to the program window are disabled during recording.
Choosing the slide layout
After clicking on you will see a dialog in which you can choose basic layout of the screencast slides.
You can choose just plain images (Fill Slide) or to include a text box next to or below the image in the slide.
Screencasts are often easier to understand if you give the user a pause after operations. This option automatically inserts a pause after every mouse cursor click in the screencast. You can also add pauses after every animated element manually, if you wish.
Spotlight animations are a great way to guide your users through your screencast by focusing on what is important. They shine a "spotlight" on the area you select and can move with the mouse cursor and perform other animations. This option automatically adds a spotlight to every slide that you just need to edit later. See Animated Spotlights for details.
Timing automatic screenshots:
Automatic screenshots are made before the mouse click reaches your program. To capture a menu and then a submenu, click on the submenu name quickly before the submenu pops open, then click in the submenu.
You can preview, correct and reset the screencast while you are making it!
•The tool in the icon bar at the top of the screen interrupts capture and displays what you have already captured in full interactive mode, with play controls. Just select again to resume after previewing.
•The tool allows you to delete the last capture or all captures in case you make a mistake. You can combine this with the preview function to check every slide as you make it and delete if necessary – another relaxing feature that is impossible in video screencasts.
Relax! There is no hurry and mistakes are not a problem!
This isn't like video, so you can forget about video stress. Nothing is recorded between screenshots and screenshots you don't need can always be deleted. You can also always add new steps anywhere in the screencast later. You can do this either by adding slides with screenshots (see below) or by using the Insert Screencast tool to add multiple steps to your current screencast.
|
You can actually preview your screencast while you are making it and correct the steps as you go (see above). Do make use of that great feature; it can save you a lot of time before you even get to the editing stage.
When you finish recording a new HelpXplain project is created and opened. You will see all the slides you just made in the workspace on the right. To see what you've got you can now do a live preview in HelpXplain, or a quick publish.
Preview in HelpXplain
Just select the option in the tab or the Preview button in the HelpXplain title bar. This will give you a live, fully interactive preview of the entire screencast as it will look when it's integrated in a web page.
Do a quick publish
You can also publish the screencast and preview it directly in a web browser.
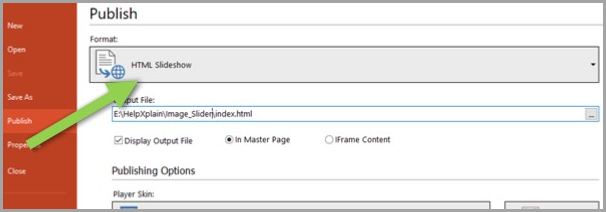
1.Select in the menu.
2.Click on the bar at the top and select as the format to publish.
3.Choose an EMPTY output folder with the [..] browse button in the Output File: field. This is important because the output contains multiple files and folders.
4.Select your configuration options. See the Publish dialog reference if they are not self-explanatory.
Skin selection: The Minimalistic Skin is ideal for screencasts in which the user needs to click to proceed to the next slide. The Start/Replay Skin is a better choice for screencasts that play automatically.
5.Before clicking on , make sure that the In Master Page button is selected. This shows how the slider will look in a real web page and includes a lot of useful information.
6.Click on to generate and view your screencast. Information on how to add it to a web page will be displayed there.
You can then play your screencast, step through it manually and preview it in different sizes for different monitors and device types. You will then probably want to do some editing and add some additional information to some of the slides.
|
Finally, you will probably want to add some additional information on the screen for the people viewing your screencast. For example, you could add a callout bubble to explain what is happening, or a marker to highlight and draw attention to something.
These two examples show the basic procedure. It is the same for all the elements you can add with the tools in the tab.
Adding a text callout bubble
1.In the list on the left, select the slide where you want to add the callout.
2.Click inside the slide in the editor window.
3.Select the tool, choose a callout shape and click in the slide to insert the callout (accuracy is not important).
•Position and resize the callout with the mouse
•Change the length and direction of its pointer by dragging the yellow handle on the tip of the pointer.
•Hold CTRL or SHIFT to drag the pointer in fixed increments or to snap it to the grid, if snap to grid is activated in the View menu.
•Drag the blue (+) handle to create additional pointers.
Adding an animated marker for highlighting
All shapes can be animated, but markers are animated automatically. They draw themselves when the slide appears, drawing attention to what they are highlighting. In a screencast they will be drawn after the automatic mouse cursor moves, by default (this can be changed).
See Animating Slide Content for details on how to animate elements in slides.
1.Select your slide in the list, then select one of the colored from the bottom of the menu.
2.Drag around the area in the slide you want to highlight to insert the marker.
3.Adjust the position and the size with the mouse if necessary.
When you publish, the marker will be drawn when the slide appears in the screencast.
Changing when the marker is drawn
Animations are drawn in order and the order is shown by the small colored numbers in the top right corner of each animated element. See Animating Slide Content for details on how to animate elements in slides. You can change the order if there are multiple animated elements. For example, in this slide there is a text callout that animates first (1) and a marker that animates after it (2). The orange number tags are visible in the top right corner of each element:
The orange tags show the elements that animate relative to the start of the slide. The green tags, like the cursor in the above example, show the elements that animate relative to the end of the slide. So in this slide, the text callout will animate first after the slide appears, followed by the red marker. When the slide exit command is issued the cursor with the green tag will animate and the slide will then exit after the animation has finished.
1.Select the element whose order you want to change.
2.In the tab, open the tool and click on Move Earlier or Move Later. The colored numbers in the animated elements change to show the new order.
|
Tip: Don't activate slide transitions in screencasts!
In a screencast slide transition animation is disabled by default and you don't want to switch it on. Screencasts work by quickly switching between slides without animation. Combined with the animated mouse pointer and the way the dialogs appear and disappear when the slides are switched, this creates the illusion of a movie. If you animate slide transitions that doesn't work.
Just select Show (no animation) as the transition for the slide. To select it for all slides:
1.Select and click on any slide in the editor window on the right. Then press CTRL+A to select all slides.
2.In the Presentation Properties pane on the right select Show (no animation) under the Transition heading.
Tip: Typewriter Text animation
Every element that you add to a slide can be animated. You can make elements appear in order to guide your user through what you wan to explain to them. See Animating Slide Content for details on how to animate elements in slides.
When you are adding a series of instructions the Typewriter Text animation is a great way to guide your users through the tutorial. This animation "types" the text on the screen one character at a time. If you adjust the duration to reading speed the user will automatically follow the instructions from one step to the next.
You can see this in action in the Xplain under the "What went wrong" heading further below on this page.
You can use the Typewriter Text animation on any element containing text. Just select the element, then select the Typewriter Text animation for it in the tab and set the duration and delay.
Changing your screencast: Deleting and adding slides
In contrast to video screencasts, you can insert and remove steps in a HelpXplain screencast very easily. You don't need to repeat the entire screencast just to correct a small mistake or add something you forgot.
If you want to add multiple new steps you will want to use the Insert Screencast mode – see Inserting / Adding To Screencasts for details on how to do this. However, you can also use the add slide/screenshot tool to quickly add individual steps. Here's an example of how to do this with a quick screencast with a couple of typical errors:
Replace Text in Notepad++
What went wrong:
When making the screencast I clicked on the Edit menu first, instead of on Search. Also, I forgot to make a slide of the open Search dialog that I wanted to illustrate. In HelpXplain, this is very easy to fix:
Correcting mistakes in screencasts
And here is the corrected version
Replace Text in Notepad++
Tip: Leave the window of the program you are documenting open while you are working on the screencast. If you don't change its dimensions you can easily and seamlessly add additional slides to the screencast.
How to delete slides
Delete a slide:
1.Select the slide in the list on the left.
2.Press the DELETE key on your keyboard or right-click on the slide entry and select Delete Slide.
Mouse cursor movement will not be disturbed by this. The mouse cursor will simply reference the cursor position in the slide that is now the next slide in the list.
How to add to an existing screencast
You can also seamlessly add additional steps to a screencast with the tool in the tool in the tab. See Inserting / Adding To Screencasts for full instructions,
How to delete add new static slides
An addition to inserting new screencast components, you can also add new static slides. This is the same as adding a slide to any Xplain.
Add a new slide:
New slides are added after the currently selected slide.
1.In the list on the left, select the slide after which you want to add the new slide.
2.Open the tool and choose the kind of content you want to insert (blank slide, a screenshot, a picture and so on).
You may need to adjust the position and animation of the mouse cursor after inserting the new screenshot. To adjust the animation, select the cursor, then check its settings in the Animations tab. See Animating Slide Content for details on how to animate elements in slides.